
As I’m getting ready to escape the blizzard that’s about to hit Boston in favor of warmer weather (on a wicked cheap flight which I’ll write about tomorrow), I figured it might be good to do a post about my pre-travel routine when I’m flying internationally.
1. Make sure my passport is packed
I know, it seems fairly obvious, but given the horror stories I hear from time to time, I figure it’s worth mentioning. I also like to make a few photocopies of my passport so that I can keep my actual passport in the safe where I’m staying, and carry the copies around.
If you have a yellow fever certificate (which likely means that you’ve been to a country where yellow fever is a concern), it’s good to carry this with your passport in case an immigration agent notices a stamp from that country in your passport and gets concerned.
While I know it may also seem like a little thing, I also like to carry a pen with my passport to fill out any necessary immigration paperwork so that I don’t have to bug the person next to me on my flight or the flight attendant for one.
2. Download an offline map of where I’m going, and add any places I want to go to
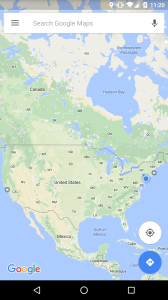
While Google Maps has been an invaluable resource for getting directions from place to place in the US, many people don’t know that you can download offline information for where you’re going from Google Maps in advance, so that you can still get directions from place to place if you don’t have a wi-fi signal or data. It’s a fairly easy process:
- First, from the home screen, click on the three horizontal bars in the upper left to bring up settings.
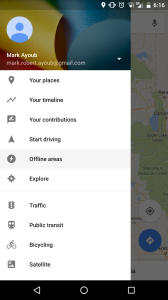
- Select “Offline areas”
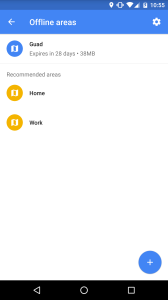
- From the “Offline areas” screen, select the plus sign in the bottom right
- Hover the blue square over the area you wish to download, and select “DOWNLOAD”
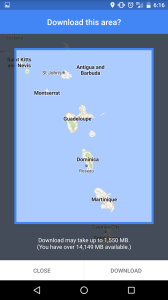
For some areas, Google Maps may not allow you to save the region (as was the case with Dubai), so you’ll need to manually zoom in/out on any regions you want it to save.
Then, if there are any particular places I want to go to, I can make sure they show up on my map offline by doing the following (also known as “dropping a pin”):
- Locate the place I want to go to, and tap on the red pin
- Click “Save”
- The place now will appear as a yellow star whenever I access that map, regardless of if I have internet


3. Notify my debit/credit card issuer(s) where I’ll be traveling, to avoid them from denying transactions in the name of fraud
In the old days, this had to be done over phone. Luckily, for people like me who dread talking on the phone with anyone, this can almost always be done online. Note that some issuers (particularly American Express) do not allow you to do that, and have their own algorithm to determine fraud.
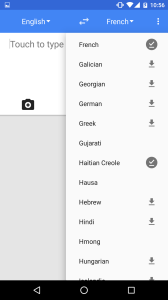
4. Download the offline language package (if available) of the main language(s) spoken in the country that I’m going to
While it’s not perfect, I’ve generally been impressed with Google Translate, and they allow you to download offline translation packages of the most commonly spoken languages so that even if you’re without wi-fi or data, you can still translate foreign words into English and vice versa. I’ve found that this is fun to have regardless of the English proficiency of the place you’re going, as it’s always fun to use to translate signs, or to hold conversations with strangers who may not have as good a command of English (this was a really fun way to pass time on a long bus ride I took in Indonesia last year). After you’ve downloaded the app, just go to the dropdown menu on the right side, and select the language(s) you need:
Make sure to delete this when you get back so it doesn’t consume unnecessary space on your phone.
5. Download the app for the airline(s) I’m flying so I can get my boarding pass in advance
This is a great way to avoid needing to wait in line at the check-in counter to get your ticket, as well as to avoid trying to find a printer while you’re traveling. All major US airlines have a good app, and most major airlines in the world have some sort of app, though some of them look like they were designed by someone designing their first app and may not be too reliable. Either way, there’s no harm in trying.
6. Download the TripAdvisor offline package for the city (or cities) which I’m going to
While it comes as no surprise that Yelp has surpassed TripAdvisor in popularity in the US due to their excellent spam filtering and other reasons, TripAdvisor is still the most used review site throughout the world, though it’s often good to subtract half a star to a full star from the rating to get a more accurate read, as well as read through the reviews for obvious fake posts. This of course shouldn’t substitute for any research you’ve done in advance, or recommendations you’ve received from friends, but it’s a good backup to have if the place you want to go to is closed (either for that time or permanently) or you can’t find a place. To download it, first go to “Downloaded Cities” from the TripAdvisor app home page, then select “Download a City”, then select the city you wish to download:


Unfortunately, there are a fair amount of cities/areas not available offline, but if you have the option to do an offline download, you might as well.
7. Print out my return flight info
This is another thing that more often than not won’t be necessary, but you might as well do it because of the minimal effort required. I like to do this for the occasional immigration officer who wants to make sure you’re not planning on coming to their country with the intent of never leaving (and yes, I know you probably have it all on your phone, but some officials prefer paper, not to mention you can lose your phone). I usually will also write down my hotel and any other transportation info on this paper in the instance that I (again) lose my phone.
8. Add the currency of the country I’m going to on my currency converter app (I use XE) and check the latest rate
This is helpful in the situation that I don’t have data or wi-fi and need to do a quick currency conversion (though this will only give you the rate for the last time I had internet, and may not reflect sudden plunges that are often common in countries with less stable currencies, like the time when I was in South Africa and the reformist finance minister was fired, causing the currency to drop 15% in a day).
9. Check the weather
Again, this may seem obvious (especially as weather was likely a consideration when planning the trip), but it never hurts to be prepared so I can pack an extra item or two for clothing for some last-minute unplanned weather developments.
10. Pack a universal power adapter
Even if you’re sure the country you’re going to has the same outlets as your home country, given how lightweight these are, it can’t hurt to put one in, in the rare event that you decide to go to a neighboring country, and/or have an unexpected layover in a different airport with a different. Of course, there’s no such thing has truly universal (for example, most will not work in Switzerland), so it’s always good to check beforehand.
Did I miss something? Feel free to e-mail me or post in the comments below.
